

If you ventured outside today, chances are you encountered wayfinding signage. They are all around us, but not all wayfinding signs are solely dedicated to getting us from point A to point B. Sometimes wayfinding does more: it can set the tone for that community’s personality, convey attitude, or subtly reference community strengths. It makes you feel like you’re somewhere special – like you belong.
“It makes you feel like you’re somewhere special – like you belong.”
Creating a branded wayfinding program for your community means delivering an experience that people remember. It fosters a positive impression, while guiding visitors to where they want to go. Here’s how we recommend our clients go about creating a branded wayfinding program that’s both effective and memorable:
Step 1. Establish both a Steering Committee and a Stakeholder Committee
You can’t do it alone, and you really shouldn’t. One person in a community can drive the initiative, but you’ll need input from a variety of different people who live or engage with the community in some way. We recommend leveraging two committees:
The Steering Committee is typically 8 to 12 people who represent a diverse cross-section of your community’s leadership. It’s especially important that you go beyond the walls of your government building for Steering Committee members because you need insights from people beyond city staff. This may include business owners, thought-leaders, planners, residents, local organizations, etc. The Steering Committee is the decision-making body – seeing the project through, from start to finish, and providing insight and approval at each milestone.
The Stakeholder Committee can be larger – typically 20+ people. They provide additional insights as well as being a sounding board for wayfinding ideas and opportunities. Again, diversity in roles, points-of-view, investment in the community, age, cultural background, and more are important for getting a 360-perspective on the project. Stakeholders will weigh-in on direction-setting issues that are uncovered during the discovery stage (Step 4). More on that later; first, let’s…
Step 2. Find your wayfinding partner
Most communities partner with an outside design firm to create the look, feel and overall creative direction for the branded wayfinding (ahem…such as Guide). This partner should also map out the where, why, and how behind the wayfinding recommendations: where signs should be placed, why they are important, and how they will serve a specific purpose. Wayfinding placement is itself an art – not just in the “pretty picture” sense, but in the ways a perfectly placed sign can capture your attention at the right moment. Signage also needs to carry that branded feel. Do you have an existing brand you can work with? Or, does the branding need to happen from scratch?
The right partner knows how to go beyond branding to draft wayfinding that feels authentic to you and takes people where they need to go. It is both art and science, so it’s important to ask potential partners about their experience in community wayfinding: Do they have a specific market focus? Do they have more experience in interior or exterior wayfinding? Have they worked with communities in the past? Do they offer full-scale programs? How do they engage the public throughout the process? Finding the right partner is critical to both the process and the outcome – a firm that checks all the boxes and demonstrates their experience with similar projects.
Step 3: Determine your budgets for design, strategy and fabrication
As with most things, you’ll find a range of options. The right design partner can help you establish realistic parameters for what’s possible, work with you to identify the materials that support the design as well as your budget, and help you make the most of your project. As a community, you may also need help phasing out implementation of your signage to manage cash flow.
Beyond the planning portion of the project, your budget may include sign fabrication and installation, as well as oversight of the entire process – from prototypes to placing signs. Finding a experienced partner helps when it comes time to select a fabricator. Your consultant will know which fabricators are most experienced, so oversight doesn’t eat up your time, budget, or patience.
Step 4. Conduct discovery sessions
Possibly the most important part of the process – and a step that is too often skipped – is Discovery. Expect at least two focused Discovery Workshops – one with the Steering Committee and one with the Stakeholder Committee. The goal of these sessions is to identify challenges you’re facing and overall objectives for the program. Things like: What are the top destinations? Where are the city gateways? Which travel paths do people follow? Where do pedestrians gather? Is parking an issue? Safety?
We also discuss the city’s brand and personality. What sets you apart? Who is traversing your community? What draws or attracts visitors? These sessions are interactive and engaging to help foster discussion. Discovery Workshops and a community-wide tour are key to successful outcomes.
Step 5. Explore design considerations
During discovery, we also begin to explore design options. Style and mood boards help committee members identify the look-and-feel that represents the community. Once we’ve established a general design direction, we merge form and function for signs that cover all the bases.
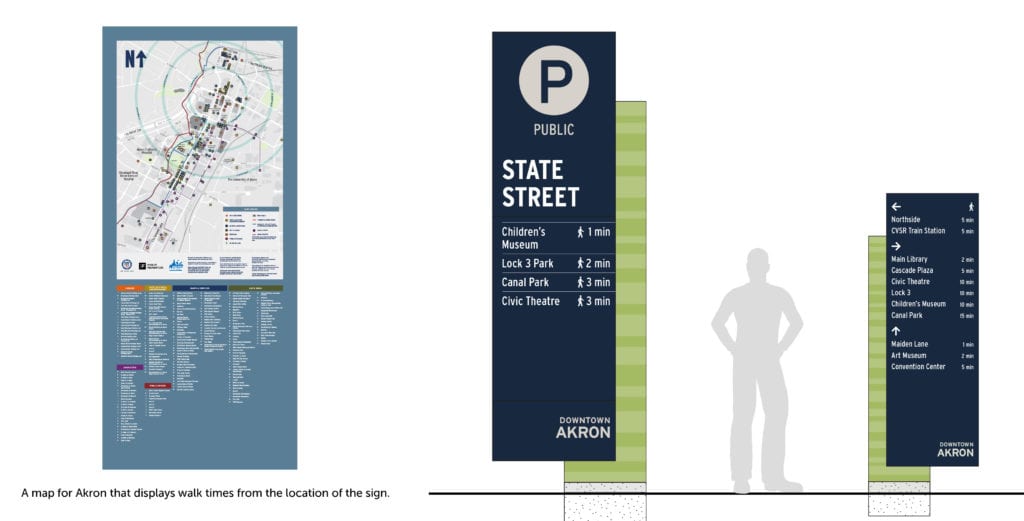
For example, we recently worked with Downtown Akron who had a perceived lack of public parking. However, the city had plenty of parking; what they didn’t have was parking that was clearly marked and well lit. Our signage solution incorporated lighting and a unique labeling system that told visitors which destinations were easily accessible from each lot: a three-minute walk to the theater, a two-minute walk to the museum, etc. Then, we made the signage look good and consistent, using colors and materials that tied back to the personality of the city.
Step 6. Determine “what goes where”
Also known as “programming,” this step maps out exactly where everything goes. You don’t want “sign clutter,” but you do want to ensure that the proper signage is in place to accommodate vehicular and foot traffic, among other modes of transportation. Information from the Discovery Workshops can help identify key travel paths and decision points where people decide whether to go left, right or straight. Test out the potential solutions and use tools like Google Earth to evaluate and re-evaluate. You should also look at existing signage for ways to maximize the budget. For example, can we attach a sign to an existing pole or structure?
Step 7. Fabrication and implementation
Now the fun begins! Fabricators take the highly detailed drawings you approved and create engineered drawings that can be produced to achieve both your aesthetic and functional goals. That’s why it’s important to go with a company that has done this before. Experienced fabricators also understand the dynamic conditions your signs must endure, such as extreme temperatures, high winds or other unique conditions. They’ll make recommendations that work for you, including materials that are durable and within your budget. Samples are also critical at this stage, so you can review how everything is going to look in person.
Wayfinding is a critical component when designing your community experience, leaving visitors with positive feelings and attitudes towards your community.
Does your community’s brand make people say, “I love [insert your name here]” or whatever it is you want them to feel? If not, maybe it’s time to revisit your approach. We’re here to help.
Featured Post
Sorry, we couldn't find any posts. Please try a different search.